Sunday, May 12, 2013

Its A Boy!

Sup! Two friends o mine had a baby. Little Gregory Patrick O'Brien. Irish much? Here is the card I sent them.
The paperline is Kaisercraft Its A Boy! I nice vintage, line. Very nice. It is hard to tell in the photo but the bird there is metal.
I added a die cut of baby feel on the inside along with a poem that goes:
I can only imagine
where these tiny feet will
go in their lifetime. My
only hope is that they
never forget the way home.
Candace O.
Here is the back.
Well, there ya have it!

Oh Man Do I Love These Things!

Sup! Altered dominoes. Yup, you heard right, altered dominoes. I fell in love with these little babies the first time I made them. This was my first ever batch.
Cool huh! Alcohol inks, stamps, metal trinkets and beads and stuff and you have yourself some cool looking dominoes.
This one I glued an image face down onto the domino then carefully peeled away the back layers of paper until only the image was left.
I used alcohol inks on this one then glued the butterflies on top. I coated the sides with microbeads.
I alcohol inked the top and used a gold leafing pen on the sides and back. I stamped an image on tissue paper and then placed it on top.
Again,. alcohol inks were used on the top and a silver leafing pen on the sides. I then glued both trinkets on top.
Yup, alcohol inks then I used rub ons for both the word love and the butterfly. The top metal butterfly I glued on.
This is my very first domino ever made. I cut an image down and decoupaged the image on. I added a couple of flatback pearls and the sentiment then used a silver leaf pen on the sides and back. I did cut it too close to the word friends so instead of saying Cherish Friends it looks like it says Cherish riends.
 Well, there ya have it. My new love.

You Gotta Try it!

Sup!
Okay, time for a little product endorsement. un-du..... Adhesive and sticky stuffs remover.
Works great and doesn't destroy the rest of what you are working on like Goo Gone. Worth every penny of the cost, one bottle will last for a long time and it actually does what it says it will. Can't ask for more than that. Thank you un-du!

Oops! Oh And A Card

Haven't posted in a while but not for lack of projects. Here we go.
I did this card for my surrogate mom Lawana. She has known me my whole life, in fact her son and I would sleep in the same crib together. She was awesome back then and is still awesome now. 
I wanted something feminine and pretty like her. The papers are, I believe, Prima but I made this card months ago so I can't remember now. 
 I did not care for how much the medallion in the middle stuck out but what are ya gonna do?
 The inside photo is definitely Prima but I stamped the sentiment. 
I punched out (like with a Martha Stewart punch die NOT I punched out a butterfly) the butterfly twice and had the top one on pop dots so he could stick up. 
Well, there ya have it. 

Sunday, February 24, 2013

Check Out My Chest...Of Drawers! Ha! Fooled Ya!

Sup!
A few months back I purchased a miniature chest of drawers made of bare wood with the intent of altering it. I finally attended to it at this was the result.
I wanted to alter it in a shabby chic vane. My first attempt at such a genre. Actually this is only my second alteration of something of this nature at all. Oh let me just tell you! I love it almost as much as shadowboxes.
Here are the sides
Here is the back
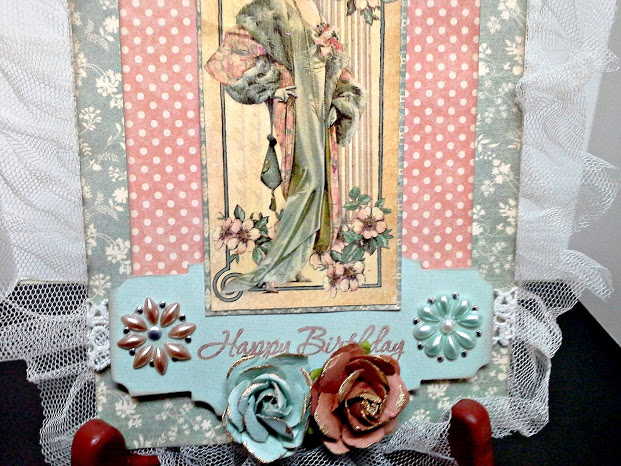
Here is the top of the dresser in detail

And a little close up detail

Tada!
Okay, I want to discuss the crackle look on the paint for a minute. I did not use anything more than glue. I've seen a few blogs reference it, so I tried it myself and it does work awesome. Better in fact, than the stupid $9.00 of crackle medium I bought and compared side by side. Here, allow me a brief rundown. It is super simple.
Paint your item in the base coat you want to use. I chose an acrylic in espresso brown.
Buy a cheap bottle of white all purpose glue. The kind you used in school. Don't even splurge on name brand like Elmers, grab that cheap crap.
Apply an even coat to your item once the base coat has dried.

Let it dry until its tacky to the touch. Aprox 3 - 5 minutes depending. You should feel some resistance of the glue when you touch it with your finger.
Paint the top coat the color of your choice. I used an acrylic in off white.
Apply using as few strokes as possible. The more strokes the bigger the chance you are then actually moving the glue around underneath.
You will start to see some cracks right after painting but after about five minutes you will see lots of them. Big ones. Nice and deep too. So much better than a crackle medium.
Cool huh! Here is what I learned. The smoother the surface the bigger the cracks. The back panel of the chest was super smooth and the crackle back there was dreamy. The rest was a rough wood and they came out great but not as pronounced at the smoother surface. Also, allow extra time for the top coat to dry once the glue and paint is on. Say three times the normal drying time.
Some tutorials suggest cutting the glue with water. I did not. If however, you are working on something that does require smaller cracks then mixing with water will do that.
Okay, so I am a convert. I will never use anything else.
Well there ya have it!

I Am A Card Making Fool!

Sup!
I am still in the throes of "Birthday Mania" here in Ansaldoland. So I have a couple of more cards to share in addition to a Thank You card.
First up, we got a great Thank You card along with a monetary gift from a customer. Now, I'm not sure of the protocol regarding sending a thank you card for a thank you card, it seems that could go on for infinity, but I really wanted to acknowledge the gift and the kindness. Here is the card:
I used Graphic 45 Secret Garden, which I ADORE!
You can't tell but I used Glossy Accents on the sticker inside the card.
I used Petaloo flowers and the charm is Prima.

Next is a card I made for Bean, Keith's sister, for her birthday.
Okay, I spent a stupid amount of time working on this card. I could not settle on the embellies. The first draft came out like this:
I hated the bow, so I lost it, added some Prima flowers and added some lace all around the card. Of course the papers are Graphic 45 A Ladies Diary. My FAVEORITE EVER!!!
Here is the inside.

Next up is Lawana's birthday card. A family friend who has known me since I was in a crib. I adore her. She was always so pretty I wanted to make a card that was a beautiful as she was.
I am beginning to fall in love with Prima. I mean I always loved their flowers but I have come to love their embellies and papers as well.
The papers on the front are Heidi Swapp  and inside are Prima Divine. The flowers on the front are Prima Lifetime and the chipboard is Prima Divine.
Well, there ya have it!

Saturday, February 16, 2013

A Gift Of Cards For You!

Sup!
Okay, so I decided to make a bunch of all occasion cards and send them off as a gift for my friend Dawna to use throughout the year. I am getting a little better at making cards so, sure, lets do it.
First, this is Dawna's actual birthday card. She is a February baby so I did a 'birthday valentine" card. I embellished heavily on the inside as well.
The front. Crate Paper's Fourteen collection mixed in with a touch of Pretty Party. 
 The inside top
The inside bottom.
I am a fan of the over the top card!
And here are the cards I made for her to use.
Graphic 45 A Ladies Diary ( my fave of the Graphic 45 papers). I wanted a masculine card.
Graphic 45 A ladies Diary. I think this is my favorite of this batch.
Graphic 45 Curtain Call.
Pebbles Sunnyside collection. I wanted to give her cards in different genres to accommodate different personalities.
Pebbles Walnut Grove collection. I hate the glare I picked up in the photo but the centerpiece is a sticker I put diamond glaze on. It came out cool.
Pebbles Sunnyside Collection. Including the stamped tag there in the middle. The stamp is Pebbles also. The Sunnyside collection is ideal for cardmakers.
Pebbles Walnut Grove & Sunnyside. Pebbles is wonderful for its ability to mix different collections together easily.

While making all these cards my friend Lorna sent me an awesome cookbook from back home, Louisiana, so of course I had to make her a thank you card. Here it is.
The papers are Crate Paper, Random collection and the charm is Prima but I am not sure of the chipboard.
Yup, I was a card making machine here. Now, if you will excuse me I have two more birthday cards to make, a thank you card and two gifts! Yay!!!!!!!!!! I love it!!!
There ya have it!