Sunday, August 25, 2013

A Step Card....Or Two

Sup!
So, in my ever constant perusing of Pintrest and, blogs I find on Pintrest I stumbled upon Step cards. Both the Center step card, the Side Step Card and all of the many variants that exist. Why had I not seen this glorious creation prior to now? Okay, no need to fret, you have discovered them now and that is all that matters.
Since my Mother In Law's birthday and anniversary were coming up I decided I would create a step card for the occasion. What I ended up creating was two. Have a look see.
Since her anniversary was a day after her birthday I wanted to make two cards that sit together. Here is the birthday card.

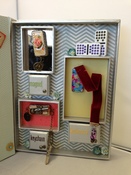
And here is her anniversary card.
They were a lot of fun to make. I found a tutorial online, there are a ton out there but the on I used was at Splitcoast Stampers and can be found here. Although I want to be clear, I used different measurements as I wanted my cards to be bigger but the concept I got from that great tutorial. I also needed to add a piece of stabilizing card stock on the bottom due to the heaviness of my embellishments. Should you want to make your own and need help just shoot me an email. I'd be happy to give you a hand.

I found some Kaisercraft rub ons that were applicable so each side has a saying just below the stamped salutations.


I also decorated the backside of each card
So here's the problem, these bad boys don't fold, bend or otherwise convert into any other shape for transport in the mail. Yup..... So what I am going to do is wrap the hell out of them in bubble wrap and mark the box they are in fragile, do not stack, this side up and any other terminology I think might help them travel from Arizona to Connecticut safely........ I will let you know how it goes.

Well there ya have it, if you are thinking of making a step card, go for it. They are a fun alternative to the normal card.

Wednesday, August 7, 2013

I Do Believe In Fairies! I do, I do!

Sup!
I have been itching to do a diorama piece so I started off by creating my first stand up fairy.
Okay, so I fussy cut a fairy from an old Graphic 45 collection, Once Upon A Springtime. Once cut I traced around her on to heavy cardstock and fussy cut that. I then glued the two together with a toothpick in the middle so she would stand upright. I then decorated her with Stickles and Liquid Pearls and glued her to a base. The base in this case being one of those wooden bingo numbers, I then used some craft foliage to camouflage both the bingo number and the horrid job I did on her feets.
I purchased a glass dome by Melissa Frances today with the purpose of creating a home for her in it. You will see her again once I complete it.
Well, there ya have it.

Another Manly Man Card.... For Men...

Sup!
A friend of mine is having a birthday this week so I made a card. I did a lot of research prior to making the card as I always struggle with cards for "dudes". Wow, not a lot of choice out there. I finally decided on a retro theme and even came up with a clever caption inside.


I used Farmhouse Paper Company Market Square collection, which I've had for a while but never put to use before. Honestly, I quite like the line and the quality of the paper so I am going to purchase more Farmhouse products in the future. The paper is nice and heavy, the way I like it and they lend themselves easily to either masculine or feminine uses. I hope in the future they come out with more embellishments.
Well, there ya have it!

A Card And Box For Me Mum!

Sup! I created this card to send to my mom just because. Okay really I needed to send her some money but any excuse to make a card eh?
I created it using Kaisercraft's New Enchanted Garden collection which may be my favorite. Lots of fairies and I just love that color combination of pink and that light green. So pretty.

I also decorated one of those tiny 99 cent boxes you can get from craft stores using the same papers. 


I put tiny legs on and used some lace ribbon around the bottom. I then lined the top border of the ribbon with flatback pearl ribbon. The trim around the lid is from Elizabeth Crafts.


On the top of the lid I used all manner of random embellishments I found on my desk.
I had a lot of fun doing both and truth be told they helped to get me out of the worst case of creative block I've experienced yet.

Well, there ya have it!

Monday, June 24, 2013

Mah First Class Man!

Sup! So I have been working on altering dominoes for a few months now and have come to really love them as a medium. Its hard to believe how much stuff you can fit on a 1" x 2" space. I brought some of the dominoes I had been working on into my LSS (Local Scrapbook Store), Scraps Of Love and they suggested I teach a class. "Really? Me? Am I good enough? Hooray! Can I do it? They Love them! I'm scared!" These were just some of the thoughts that flew through my head in the first few nano seconds. I decided to teach the class ultimately which was this past Saturday. I had a great time. 

Here is the email notice that went out:


Let's Play Dominos
Back to topThis is the first class for Mari! She will be sharing with you the fun of creating Domino Art. You will be playing with Alcohol inks, Glossy Accents, paper, rub ons and more. In class you will create three dominoes that can be used as a magnet, keychain and bookmark. Join the fun on June 22nd, 10:30am-1:30pm, $30 


I wanted to stay away from just pendants to highlight the versatility of the domino. I opted instead to make a magnet, a keychain and a bookmark.


Up first is the magnet. I used a piece of Graphic 45's paper line Secret Garden and glued it to the domino. I then painted the sides and back of the domino with a Krylon silver-leaf pen and wrapped the sides with gold May Arts ribbon. I drilled a hole in the bottom of the domino, inserted an eye screw and attached that cute Websters pages charm. I used a Prima flower to top the domino, the paper underneath has a rose so they went perfectly together and then of course put some bling in one corner. The top of the domino was covered with Glossy Accents. A Basic Grey magnet was glued to the back. 

Next up is the key chain  I wanted to go with a more grunge, manly man feel. The domino was alcohol inked using Ranger's Tuscan Garden combination (red pepper, mushroom & oregano) and then topped with Tim Holtz rub ons. After that various Tim Holtz and Prima products were used to get the manly look. I again drilled holes in either end of the domino and inserted eye screws the coin  was attached to one end and the key chain fastener on the other. Here is a close up of the top of the domino.

Up close you can see all the detail. The writing you see is the rub on. Of course, the domino was again topped with a generous coat of Glossy Accents. 
Lastly we have the bookmark. I think, in terms of color, this was my favorite. The domino was alcohol inked in Ranger's Nature Walk combo (Butterscotch, Wild Plum & Stream). Stampendous stickers were placed on top and then Glossy Accents applied. I found some tiny dominoes so the same treatment was given to the mini domino as well. A hole was drilled in the end of a domino, an eye screw inserted and red velvet ribbon in ribbon clamps attached to it. Here is a close up:
I really wanted to minimize any embellishments on top as I wanted the beautiful colors of the inks to stand out. 

So my class was wonderful and the ladies who took the class were amazing.I had so much fun and learned tons from them as well. 

If altered dominoes have piqued your interest I have a couple of sites for you to check out. 

The Enchanted Gallery
This lady knows her stuff when it comes to not only dominoes but all sorts of things. Lots of tutorials about all sorts of things. Without her site I would not know nearly as much as I do. Her store is the bomb too.

Artfully Amusing
OMG do I have a craft crush on her. Her dominoes and domino books are stunning, just stunning, not to mention all the other amazing stuff she does. Check her blog out you will not be disappointed. 

Oh! One last thing. You may have noticed my photos today were much better than in posts past. I got this:
I LOVE it!!!!!!!! Awesome, wonderful, groovy, is all I have to say. Go check out their site. Well worth the money. 
Modahaus Steady Stands

Well, there ya have it!

Sunday, May 12, 2013

Its A Boy!

Sup! Two friends o mine had a baby. Little Gregory Patrick O'Brien. Irish much? Here is the card I sent them.
The paperline is Kaisercraft Its A Boy! I nice vintage, line. Very nice. It is hard to tell in the photo but the bird there is metal.
I added a die cut of baby feel on the inside along with a poem that goes:
I can only imagine
where these tiny feet will
go in their lifetime. My
only hope is that they
never forget the way home.
Candace O.
Here is the back.
Well, there ya have it!

Oh Man Do I Love These Things!

Sup! Altered dominoes. Yup, you heard right, altered dominoes. I fell in love with these little babies the first time I made them. This was my first ever batch.
Cool huh! Alcohol inks, stamps, metal trinkets and beads and stuff and you have yourself some cool looking dominoes.
This one I glued an image face down onto the domino then carefully peeled away the back layers of paper until only the image was left.
I used alcohol inks on this one then glued the butterflies on top. I coated the sides with microbeads.
I alcohol inked the top and used a gold leafing pen on the sides and back. I stamped an image on tissue paper and then placed it on top.
Again,. alcohol inks were used on the top and a silver leafing pen on the sides. I then glued both trinkets on top.
Yup, alcohol inks then I used rub ons for both the word love and the butterfly. The top metal butterfly I glued on.
This is my very first domino ever made. I cut an image down and decoupaged the image on. I added a couple of flatback pearls and the sentiment then used a silver leaf pen on the sides and back. I did cut it too close to the word friends so instead of saying Cherish Friends it looks like it says Cherish riends.
 Well, there ya have it. My new love.